
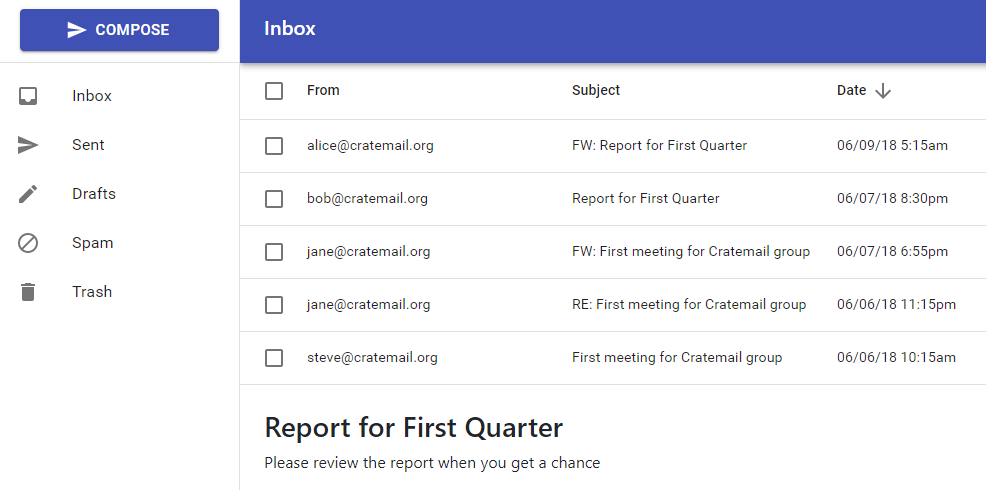
Let's develop an email client to view and send messages. We'll create a split-view layout, with email messages listed on the top half. Clicking an email message will display the full contents of the message on the bottom half. We'll add a left panel as well, where we'll place mail folders, and other webmail features. Once finished, our email client will look like this:
In Part 1, we created an ASP.NET Core Web application in Visual Studio, and used it to set up the back-end for our email application. In Part 2, we'll use the same project to build the front-end portion.
When we created the project, we selected React and Redux as the project template. Visual Studio adds this template into a folder named ClientApp. This is where we are going to build the email client, so let's get familiar with the contents of this folder first.
1. Front-end development in Visual Studio
In our Visual Studio project, go to Solution Explorer, and double-click on the ClientApp folder. Inside ClientApp, there are two folders you want to keep in mind: public, and src.
In the public folder, you'll find an index.html file that serves as the root of your application. We'll use this file to include any external CSS or JavaScript resources.
The src folder contains all our scripts. Since React and Redux relies heavily on scripting, this is where we'll be doing most of our front-end development work.
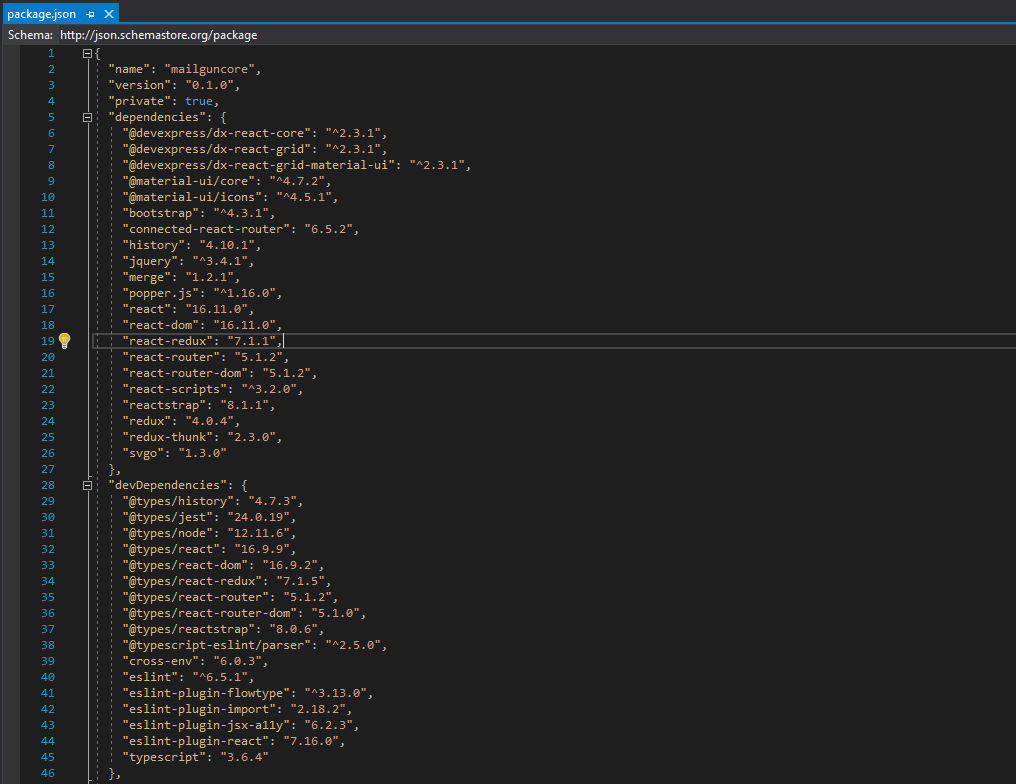
Back in the ClientApp folder, open the package.json file to view the front-end dependencies included with our project. You should see dependency entries for the React and Redux libraries, along with their version number. We'll use React to build our webmail interface as class-based components. Redux will help us synchronize data across these components. Another important dependency to note is TypeScript. We'll use TypeScript to make our codebase more robust and less error-prone.
We'll want a sophisticated UI framework to create an engaging visual experience. For this purpose, we are going to install Material UI. Additionally, we'll need an extensible grid element to display a message list that allows for sorting and selection of messages. For this, we'll use the DevExtreme React Grid. Let's go ahead and install these dependencies to our project.
1.1 Installing dependencies
Go to Tools -> NuGet Package Manager, and select Package Manager Console. In the console, run the following commands to install the dependencies mentioned:
cd Cratemail/ClientAppreplacing Cratemail with the name of your project.npm install @material-ui/coreto install the Material UI core package.npm install @material-ui/iconsto install the Material UI icon package.npm install @devexpress/dx-react-coreto install the DevExtreme React core package.npm install @devexpress/dx-react-gridto install the DevExtreme React grid package.npm install @devexpress/dx-react-grid-material-uito install the DevExtreme React grid bindings for Material UI.
Also, let's improve text display in our mail client by using the Roboto font. We'll include this font as a CSS resource. Back in Solution Explorer, go to the ClientApp folder, double-click on the public folder, and open index.html. Copy the following line and paste it anywhere inside the head tag.
<link rel="stylesheet" href="https://fonts.googleapis.com/css?family=Roboto:300,400,500,700&display=swap" />
2. Designing the Inbox
With our dependencies ready, we can start developing our email application. Let's begin working on the inbox. First, we need to figure out how to access our mail data.
2.1 Application state
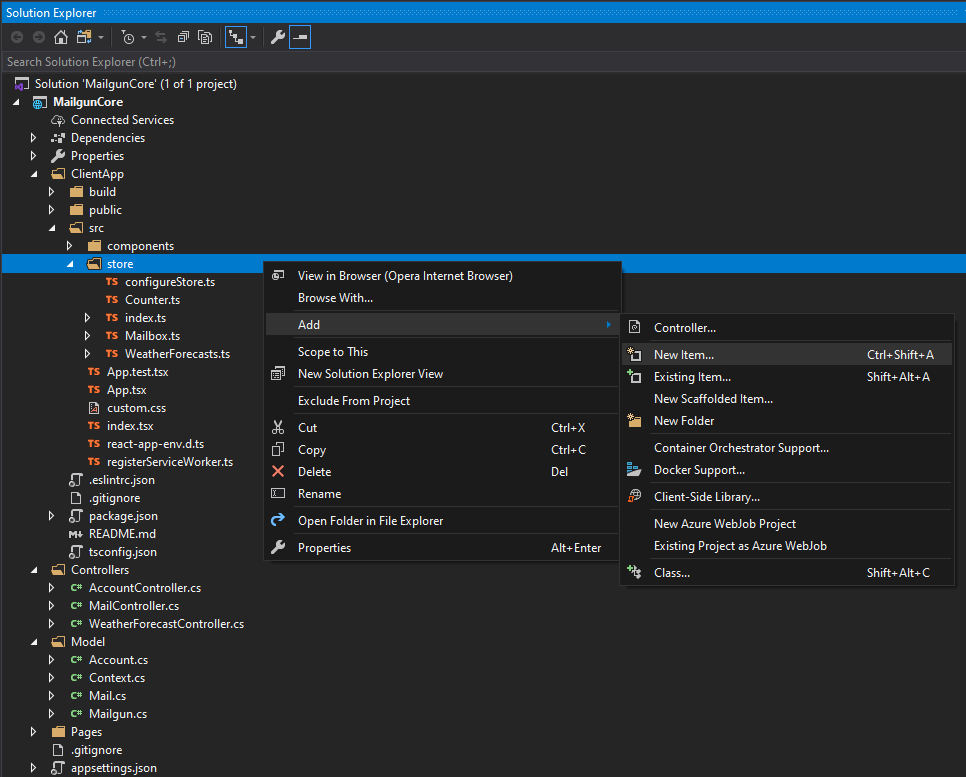
In Solution Explorer, go to ClientApp -> src. From this directory, double-click on the store folder. This folder is designated for working with data in Redux. Let's create a module here for our mail data. Right-click on store, then go to Add, select New Item, and add a new TypeScript file called Mailbox.ts.
In Redux, data is passed to your application via reducers. We'll create a reducer and plug in our mail data in Mailbox.ts. However, before we retrieve emails from our database, we'll create a simple data representation for now, so we can focus on designing our inbox first.
Add the following content to Mailbox.ts:
import { Reducer } from 'redux';export interface Mailbox {mailbox: Mail[];}export interface Mail {id: number;sender: string;recipient: string;mailSubject: string;bodyHtml: string;mailDate: string;}const initialState: Mailbox = {mailbox: [{ id: 1, sender: "steve@cratemail.org", recipient: "jane@cratemail.org", mailSubject: "First meeting for Cratemail group", bodyHtml: "Please forward the documentation to Bill", mailDate: "06/06/18 10:15am" },{ id: 2, sender: "jane@cratemail.org", recipient: "steve@cratemail.org", mailSubject: "RE: First meeting for Cratemail group", bodyHtml: "Will forward the info", mailDate: "06/06/18 11:15pm" },{ id: 3, sender: "jane@cratemail.org", recipient: "bill@cratemail.org", mailSubject: "FW: First meeting for Cratemail group", bodyHtml: "Sending you the documentation from Steve", mailDate: "06/07/18 6:55pm" },{ id: 4, sender: "bob@cratemail.org", recipient: "alice@cratemail.org", mailSubject: "Report for First Quarter", bodyHtml: "Please review the report when you get a chance", mailDate: "06/07/18 8:30pm" },{ id: 5, sender: "alice@cratemail.org", recipient: "steve@cratemail.org", mailSubject: "FW: Report for First Quarter", bodyHtml: "Need to make changes to the report", mailDate: "06/09/18 5:15am" }]};export const reducer: Reducer<Mailbox> = (state = initialState, action) => {return state;};
Go back to the store folder, and open index.ts. Add a reference to the reducer here to make it available for our application.
import * as MailboxStore from './Mailbox';export interface ApplicationState {mailbox: MailboxStore.Mailbox;}export const reducers = {mailbox: MailboxStore.reducer,}
Now we'll be able to integrate mail data in our React components.
2.2 Mailbox component
In Solution Explorer, go to ClientApp -> src, and double-click on the components folder. As the name suggests, the components folder is where you'll want to keep your React components. Let's create a component for our inbox. Right-click on the components folder, then go to Add, select New Item, and add a new TypeScript JSX file called Mailbox.tsx with the following content:
import * as React from 'react';import { connect } from 'react-redux';import { ApplicationState } from '../store';import * as MailboxStore from '../store/Mailbox';import {SelectionState, IntegratedSelection,SortingState, IntegratedSorting,Sorting, Column} from '@devexpress/dx-react-grid';import {Grid, Table, TableHeaderRow, TableSelection, VirtualTable} from '@devexpress/dx-react-grid-material-ui';interface MailboxState {columns: Column[];selection: Array<string | number>;sorting: Sorting[];mail: MailboxStore.Mail;}class Mailbox extends React.Component<MailboxStore.Mailbox, MailboxState> {public state = {columns: [{ name: 'sender', title: 'From' },{ name: 'mailSubject', title: 'Subject' },{ name: 'mailDate', title: 'Date' },],sorting: [{ columnName: 'mailDate', direction: 'desc' as const }],selection: [],mail: {} as MailboxStore.Mail}private setSorting = (sorting: Sorting[]) => {this.setState({ sorting });}private setSelection = (selection: Array<string | number>) => {this.setState({ selection });}private setMail = (mail: MailboxStore.Mail) => {this.setState({ mail });}public render() {return (<React.Fragment><Grid rows={this.props.mailbox} columns={this.state.columns}><SelectionStateselection={this.state.selection}onSelectionChange={this.setSelection}/><SortingStatesorting={this.state.sorting}onSortingChange={this.setSorting}/><IntegratedSelection /><IntegratedSorting /><VirtualTable height={322} rowComponent={(props: Table.DataRowProps) => (<Table.Row{...props}onClick={() => this.setMail(props.row)}style={{ cursor: 'pointer' }}/>)} /><TableHeaderRow showSortingControls /><TableSelection showSelectAll /></Grid><div style={{ padding: 24 }}><h3>{this.state.mail.mailSubject}</h3><div dangerouslySetInnerHTML={{ __html: this.state.mail.bodyHtml }}></div></div></React.Fragment>);}};export default connect((state: ApplicationState) => state.mailbox)(Mailbox);
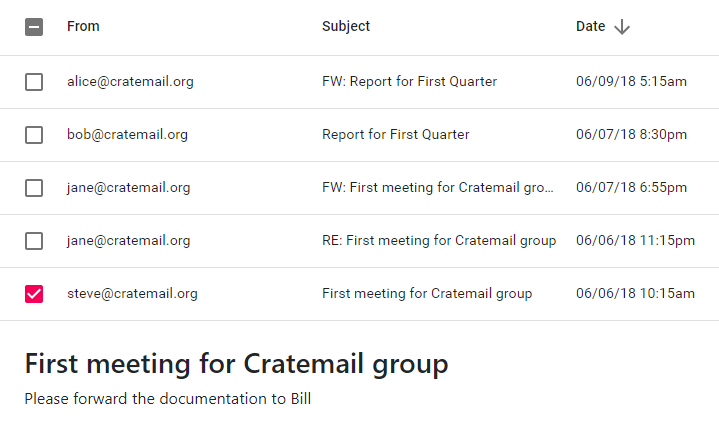
In this component, we are using the DevExtreme React Grid to display our mail data. We've also integrated sorting, so we can sort by recipient or date if needed. Clicking on a message row should display the message contents below the grid.
Let's go ahead and test our inbox. Back in Solution Explorer, go to ClientApp -> src, and open App.ts. Place the following code into this file:
import Mailbox from './components/Mailbox';export default () => (<Mailbox />);
In Visual Studio, press F5 to start debugging. This should launch a new window with our inbox in view.
2.3 Integrating data
With our inbox design ready, let's have it pull in messages from our database. To do this, we'll create a GET handler for our API controller. In Solution Explorer, go to the Controller folder, and open MailController.cs. Add the following references:
using System.Collections.Generic;using System.Data;
Now add the following GET handler to MailController.cs to retrieve all emails from our database:
[HttpGet]public IEnumerable<Mail> Get(){string selectQuery = "SELECT * FROM Mail";MySqlConnection sqlConnection = new MySqlConnection(Resources.connString);sqlConnection.Open();MySqlCommand sqlCommand = new MySqlCommand(selectQuery, sqlConnection);MySqlDataAdapter adapter = new MySqlDataAdapter(sqlCommand);DataTable dt = new DataTable();adapter.Fill(dt);List<Mail> mails = new List<Mail>();foreach (DataRow row in dt.Rows){mails.Add(new Mail{ID = Convert.ToInt32(row["ID"]),Sender = row["Sender"].ToString(),Recipient = row["Recipient"].ToString(),MailSubject = row["MailSubject"].ToString(),BodyHtml = row["BodyHtml"].ToString(),BodyPlain = row["BodyPlain"].ToString(),MailDate = row["MailDate"].ToString()});}sqlConnection.Close();return mails;}
With our GET handler in place, we can now pass mail data to our mail client through an API call. In Redux, API calls are placed in actions, which are then made available to your components via action creators. We'll add an action to request emails from our database.
Go to ClientApp -> src -> store, and open Mailbox.ts. Add the following content:
import { Reducer } from 'redux';import { AppThunkAction } from './';export interface Mailbox {mailbox: Mail[];isLoading: boolean;}export interface Mail {id: number;sender: string;recipient: string;mailSubject: string;bodyHtml: string;mailDate: string;}enum MailboxActionType {Request = "REQUEST_MAIL",Receive = "RECEIVE_MAIL"}interface RequestMailAction {type: MailboxActionType.Request;}interface ReceiveMailAction {type: MailboxActionType.Receive;mailbox: Mail[];}type MailboxAction = RequestMailAction | ReceiveMailAction;export const actionCreators = {requestMail: (): AppThunkAction<MailboxAction> => (dispatch) => {dispatch({ type: MailboxActionType.Request } as RequestMailAction);fetch(`api/Mail`).then(response => response.json() as Promise<Mail[]>).then(data => {dispatch({ type: MailboxActionType.Receive, mailbox: data } as ReceiveMailAction);});}}const initialState: Mailbox = {mailbox: [],isLoading: false}export const reducer: Reducer<Mailbox, MailboxAction> = (state = initialState, action) => {switch (action.type) {case MailboxActionType.Request:return {...state,isLoading: true}case MailboxActionType.Receive:return {...state,mailbox: action.mailbox,isLoading: false}default:break;}return state;}
With the actions in place, let's integrate the action creator into our Mailbox component. Go to ClientApp -> src -> components, and open Mailbox.ts. We'll make a few changes here.
First, include the action creator type in our component's props type.
type MailboxProps = MailboxStore.Mailbox &typeof MailboxStore.actionCreators;
Then, add the dispatch parameter in our connect() call, to bind the action creator to props:
export default connect((state: ApplicationState) => state.mailbox,MailboxStore.actionCreators)(Mailbox as any);
Finally, let's call our action inside the componentDidMount() handler, so that our data loads just after the UI has finished rendering.
public componentDidMount() {this.props.requestMail();}
Test the application once again to ensure your database request works. Next, we'll add a message composer to our mail client.
3. Building a message composer
So far, our mail client can only read messages. We need to be able to send messages as well. Let's add a Compose button that will allow us to send messages through a message composer. First, let's add a left panel to our layout where we can place our compose button.
3.1 Left panel
In Solution Explorer, go to ClientApp -> src, and open App.ts. Place the following code to add a left panel to our mail client.
import React from 'react';import AppBar from '@material-ui/core/AppBar';import Button from '@material-ui/core/Button';import Divider from '@material-ui/core/Divider';import Drawer from '@material-ui/core/Drawer';import Hidden from '@material-ui/core/Hidden';import IconButton from '@material-ui/core/IconButton';import List from '@material-ui/core/List';import ListItem from '@material-ui/core/ListItem';import ListItemIcon from '@material-ui/core/ListItemIcon';import ListItemText from '@material-ui/core/ListItemText';import Toolbar from '@material-ui/core/Toolbar';import { makeStyles, Theme, createStyles } from '@material-ui/core/styles';import MenuIcon from '@material-ui/icons/Menu';import InboxIcon from '@material-ui/icons/Inbox';import SendIcon from '@material-ui/icons/Send';import EditIcon from '@material-ui/icons/Edit';import DeleteIcon from '@material-ui/icons/Delete';import BlockIcon from '@material-ui/icons/Block';import Mailbox from './components/Mailbox';const drawerWidth = 240;const primaryColor = "#3f51b5";const useStyles = makeStyles((theme: Theme) =>createStyles({root: {display: 'flex',},drawer: {[theme.breakpoints.up('sm')]: {width: drawerWidth,flexShrink: 0,},},drawerButtonContainer: {display: 'flex',justifyContent: 'center',},drawerButton: {width: '83%',margin: '10px 0px 11px'},drawerPaper: {width: drawerWidth},appBar: {[theme.breakpoints.up('sm')]: {width: `calc(100% - ${drawerWidth}px)`,marginLeft: drawerWidth,backgroundColor: primaryColor},},appBarButton: {marginRight: theme.spacing(2),[theme.breakpoints.up('sm')]: {display: 'none',},},toolbar: theme.mixins.toolbar,content: {flexGrow: 1}}));interface Folder {name: string;icon: React.ComponentType<any>;}const Folders: Folder[] = [{ name: "Inbox", icon: InboxIcon },{ name: "Sent", icon: SendIcon },{ name: "Drafts", icon: EditIcon },{ name: "Spam", icon: BlockIcon },{ name: "Trash", icon: DeleteIcon }];export default () => {const classes = useStyles();const [title, setTitle] = React.useState("Inbox");const [mobileOpen, setMobileOpen] = React.useState(false);const toggleDrawer = () => {setMobileOpen(!mobileOpen);}const drawer = (<div><div className={classes.drawerButtonContainer}><Buttonvariant="contained"color="primary"size="large"className={classes.drawerButton}startIcon={<SendIcon />}>Compose</Button></div><Divider /><List>{Folders.map((folder, index) => {const IconComponent = folder.icon;return (<ListItem button key={index}><ListItemIcon><IconComponent /></ListItemIcon><ListItemText primary={folder.name} /></ListItem>)})}</List></div>);return (<div className={classes.root}><AppBar position="fixed" className={classes.appBar}><Toolbar><IconButtoncolor="inherit"aria-label="open drawer"edge="start"onClick={toggleDrawer}className={classes.appBarButton}><MenuIcon /></IconButton><h5>{title}</h5></Toolbar></AppBar><nav className={classes.drawer}><Hidden smUp><Drawer open={mobileOpen}onClose={toggleDrawer}classes={{ paper: classes.drawerPaper }}variant="temporary"ModalProps={{ keepMounted: true }}>{drawer}</Drawer></Hidden><Hidden xsDown><Drawer openclasses={{ paper: classes.drawerPaper }}variant="permanent">{drawer}</Drawer></Hidden></nav><main className={classes.content}><div className={classes.toolbar} /><Mailbox /></main></div>);}
In the code above, we are using the responsive drawer element from Material UI as our left panel. Our layout now has a place for buttons and mail folders. Press F5 to view the changes. It should look like this:
With the Compose button in place, we can now work on the message composer itself.
3.2 Composer component
In Solution Explorer, go to ClientApp -> src, and right-click on the components folder. Then, go to Add, select New Item, and add a new TypeScript JSX file called Composer.tsx with the following content:
import * as React from "react";import { Grid, TextField, Button } from "@material-ui/core";import Snackbar, { SnackbarOrigin } from '@material-ui/core/Snackbar';import SnackbarContent from '@material-ui/core/SnackbarContent';import IconButton from '@material-ui/core/IconButton';import CloseIcon from '@material-ui/icons/Close';import CheckCircleIcon from '@material-ui/icons/CheckCircle';import ErrorIcon from '@material-ui/icons/Error';interface Response {result: boolean,log: string}interface ComposerState {to: string,cc: string,bcc: string,subject: string,message: string,sending: boolean,success: boolean,error: boolean,log: string}const initialState: ComposerState = {to: "",cc: "",bcc: "",subject: "",message: "",sending: false,success: false,error: false,log: ""}const toastSuccessStyle = { backgroundColor: '#43a047', color: '#FFF' }const toastErrorStyle = { backgroundColor: '#e53935', color: '#FFF' }const toastMessageStyle = { display: 'flex', alignItems: 'center' }const toastActionIconStyle = { marginRight: 6 }const toastExitIconStyle = { color: '#FFF' }const toastAnchor: SnackbarOrigin = { vertical: 'bottom', horizontal: 'right' }const resetCounter = 4000;export default class Composer extends React.Component<any, ComposerState> {state = initialState;private setField = (name: string) => (event: React.ChangeEvent<HTMLInputElement>) => {this.setState({...this.state,[name]: event.target.value,});};private sendMail = () => {fetch(`api/Mail`, {method: 'PUT',headers: { 'Content-Type': 'application/json' },body: JSON.stringify({sender: "admin@cratemail.org",recipient: this.state.to,mailSubject: this.state.subject,bodyPlain: this.state.message})}).then(response => response.json()).then((data: Response) => {if (data.result) {this.setState({ ...this.state, success: true });setTimeout(() => this.setState({ ...initialState }), resetCounter);} else {this.setState({ ...this.state, error: true, log: data.log });}});}private toastClose = () => {this.setState({ ...this.state, success: false, error: false });};public render() {return (<React.Fragment><Grid container spacing={3} style={{ padding: 20 }}><Grid item xs={12} md={12}><TextField id="to" label="To" fullWidthvalue={this.state.to}onChange={this.setField('to')} /></Grid><Grid item xs={12} md={6}><TextField id="cc" label="CC" fullWidthvalue={this.state.cc}onChange={this.setField('cc')} /></Grid><Grid item xs={12} md={6}><TextField id="bcc" label="BCC" fullWidthvalue={this.state.bcc}onChange={this.setField('bcc')} /></Grid><Grid item xs={12} md={12}><TextField id="subject" label="Subject" fullWidthvalue={this.state.subject}onChange={this.setField('subject')} /></Grid><Grid item xs={12} md={12}><TextField id="message" label="Message" fullWidth multilinevalue={this.state.message}onChange={this.setField('message')} /></Grid><Grid item xs={12}><Button onClick={this.sendMail}variant="contained"color="primary">Send</Button></Grid></Grid><Snackbar open={this.state.success}onClose={this.toastClose}anchorOrigin={toastAnchor}><SnackbarContent style={toastSuccessStyle}message={<span style={toastMessageStyle}><CheckCircleIcon style={toastActionIconStyle} /><span>Message Sent!</span></span>}action={<IconButton onClick={this.toastClose}><CloseIcon style={toastExitIconStyle} /></IconButton>}/></Snackbar><Snackbar open={this.state.error}onClose={this.toastClose}anchorOrigin={toastAnchor}><SnackbarContent style={toastErrorStyle}message={<span style={toastMessageStyle}><ErrorIcon style={toastActionIconStyle} />Unable to Send. {this.state.log}</span>}action={<IconButton onClick={this.toastClose}><CloseIcon style={toastExitIconStyle} /></IconButton>}/></Snackbar></React.Fragment>);}}
In the code above, messages are sent as a PUT request to our API. To make our message composer work, we'll have to create a PUT handler in our API controller.
3.3 Sending email with Mailgun
In Solution Explorer, go to the Controllers folders and open MailController.cs. In our PUT handler, we'll send messages by passing them along to the Mailgun API. Add the following references to MailController.cs:
using RestSharp;using RestSharp.Authenticators;
Now add the following PUT method to MailController.cs:
[HttpPut]public IActionResult Put([FromBody]Mail msg){try{string mailgunAPI = "https://api.mailgun.net/v3";string domain = "cratemail.org";RestClient client = new RestClient(mailgunAPI);client.Authenticator = new HttpBasicAuthenticator("api", Resources.mailgunKey);RestRequest request = new RestRequest("{domain}/messages", Method.POST);request.AddParameter("domain", domain, ParameterType.UrlSegment);request.AddParameter("from", msg.Sender);request.AddParameter("to", msg.Recipient);request.AddParameter("subject", msg.MailSubject);request.AddParameter("text", msg.BodyPlain);IRestResponse response = client.Execute(request);return Ok(new { message = response.ErrorMessage, result = response.IsSuccessful });}catch(Exception exception){return BadRequest(new { message = exception.Message, result = false });}}
3.4 Finishing up
In Solution Explorer, go to ClientApp -> src, and open App.ts. Add a reference to the composer:
import Composer from './components/Composer';
Add the following hook logic to the functional component:
const [view, setView] = React.useState(<Mailbox />);const changeView = (viewName: string) => {setTitle(viewName);if (viewName == "Compose") {setView(<Composer />);} else {setView(<Mailbox />);}}
Add a call to changeView on your compose button and your mail folders:
const drawer = (<div><div className={classes.drawerButtonContainer}><Button onClick={() => changeView("Compose")}variant="contained"color="primary"size="large"className={classes.drawerButton}startIcon={<SendIcon />}>Compose</Button></div><Divider /><List>{Folders.map((folder, index) => {const IconComponent = folder.icon;return (<ListItem button key={index} onClick={() => changeView(folder.name)}><ListItemIcon><IconComponent /></ListItemIcon><ListItemText primary={folder.name} /></ListItem>)})}</List></div>);
Finally, place the view variable in the main content area:
<main className={classes.content}><div className={classes.toolbar} />{view}</main>
Press F5 in Visual Studio to test the message composer. You should now be able to send emails through your Mailgun account.

By now, you should have a mail client capable of viewing and sending emails with Mailgun. Let it serve as a starting point for building your own email application. Feel free to integrate additional features like an authentication layer, a spam filter, or custom mail folders.