
As a developer, I was very excited when I first heard about Mailgun and their email API. I could finally design my own email application with the layout and color scheme of my choice, without having to focus on the complexities of setting up a classic email server with SMTP and IMAP/POP3.
With Mailgun, your email is delivered as an HTTP POST request. All you have to do is store the request parameters into a database, like this:
public class Mailgun{public string Recipient { get; set; }public string Sender { get; set; }public string From { get; set; }public string Subject { get; set; }[BindProperty(Name = "body-plain")]public string BodyPlain { get; set; }[BindProperty(Name = "body-html")]public string BodyHtml { get; set; }}[HttpPost]public IActionResult Post([FromForm]Mailgun msg){string insertSql = "INSERT INTO Mail(Sender, Recipient, MailSubject, BodyHtml, BodyPlain, MailDate) VALUES (@Sender,@Recipient,@MailSubject,@BodyHtml,@BodyPlain,'{0:g}')";DateTime timestamp = TimeZoneInfo.ConvertTimeBySystemTimeZoneId(DateTime.Now, "US/Pacific");string insertQuery = String.Format(insertSql, timestamp);MySqlConnection sqlConnection = new MySqlConnection(Resources.connString);sqlConnection.Open();MySqlCommand sqlCommand = new MySqlCommand(insertQuery, sqlConnection);sqlCommand.Parameters.AddWithValue("@Sender", msg.Sender);sqlCommand.Parameters.AddWithValue("@Recipient", msg.Recipient);sqlCommand.Parameters.AddWithValue("@MailSubject", msg.Subject);sqlCommand.Parameters.AddWithValue("@BodyHtml", msg.BodyHtml);sqlCommand.Parameters.AddWithValue("@BodyPlain", msg.BodyPlain);sqlCommand.ExecuteNonQuery();sqlConnection.Close();return CreatedAtAction(nameof(Post), msg);}
In this tutorial, I'll show you how to build an email application with Mailgun. First, we'll create a server that stores incoming email to a database. Then, we will create an email client to view and send messages, building new features as we go along.
1. Launching a .NET Core server with AWS EC2
AWS can be used to quickly deploy servers in just a few clicks. For our email application, we'll want a server that can run .NET Core so that we can develop the entire application in Visual Studio. Create an AWS account if you don't already have one, then log in to AWS, go to your EC2 dashboard and launch an instance of Amazon Linux with .NET Core.
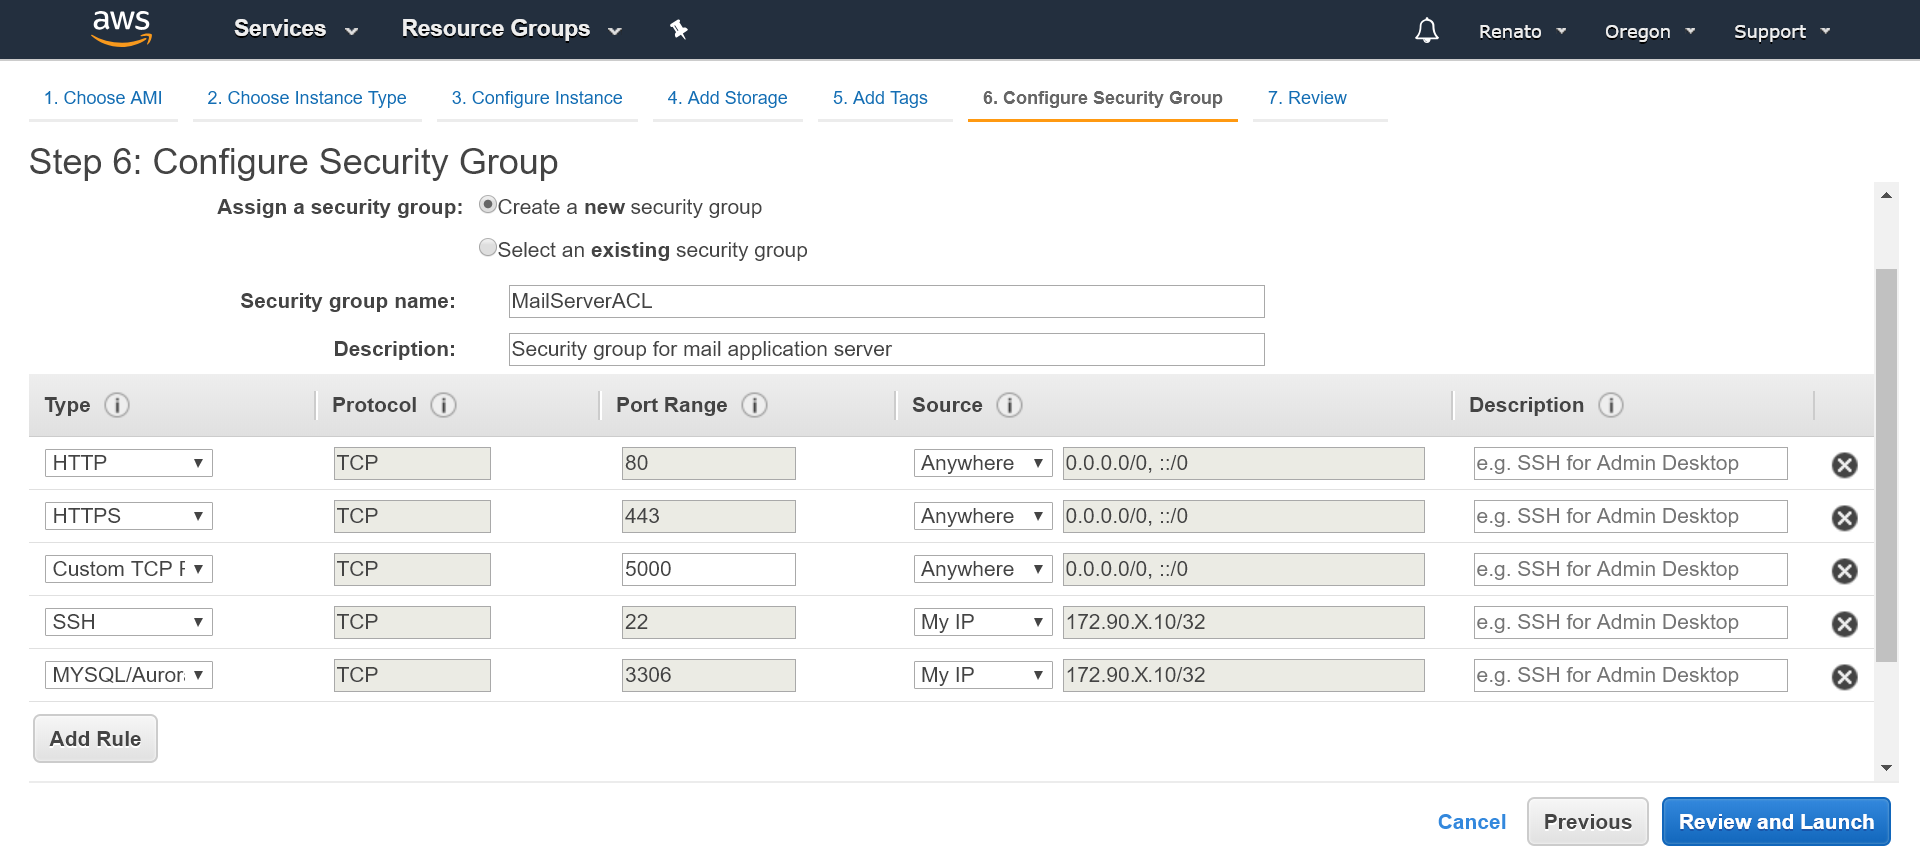
1.1 Security group
Be sure to configure a security group for your instance with the following rules:
- Open access to HTTP on port 80
- Open access to HTTPS on port 443
- Open access to Kestrel on port 5000
- Limited access to SSH on port 22
- Limited access to MySQL on port 3306
Before launch, AWS will prompt you to assign a keyfile to your instance. Be sure to remember the location of the keyfile in your system, as you'll need this keyfile to connect to the server.
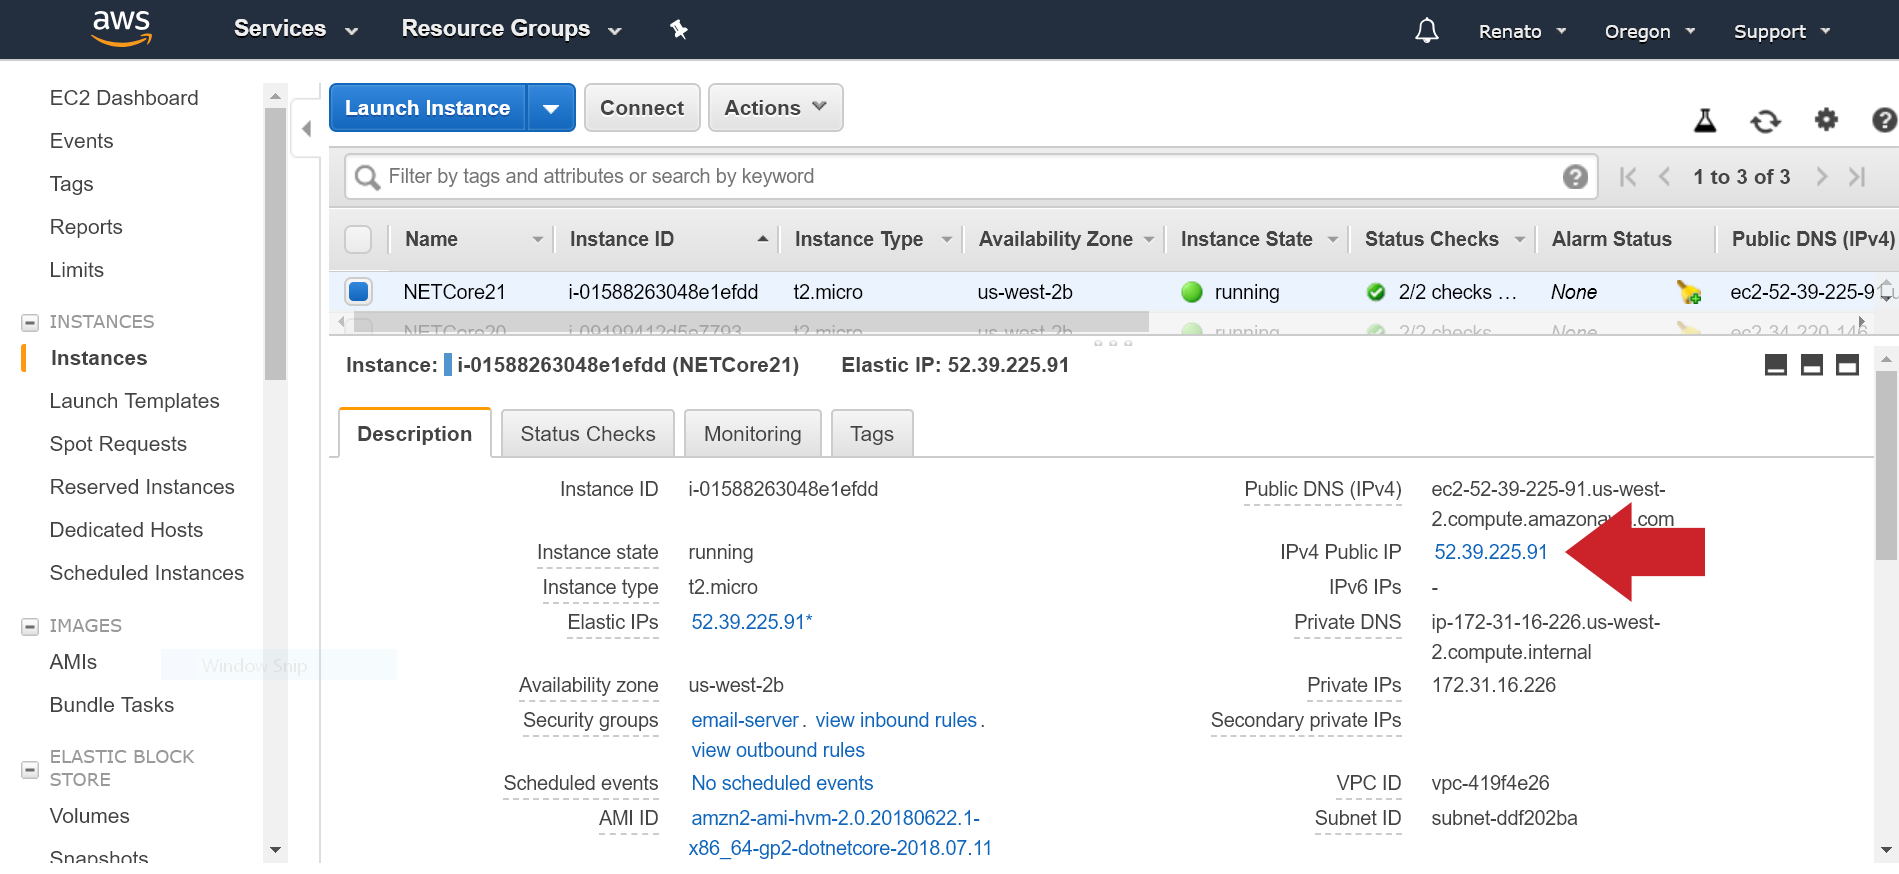
It usually takes 1-3 minutes for a newly deployed server to be fully operational. Once your server instance is running, note down the IPv4 address of your instance.
2. Domain setup with AWS Route53
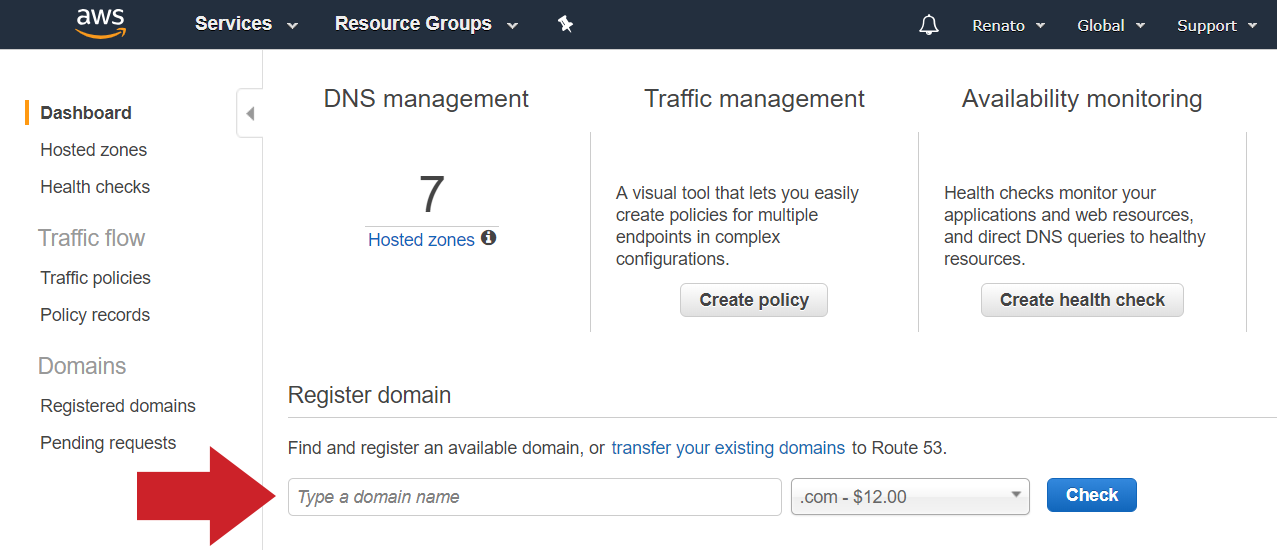
2.1 Domain registration
Back in the AWS console, go to your Route 53 dashboard and register a domain name to use for your email application. I will use cratemail.org for this tutorial.
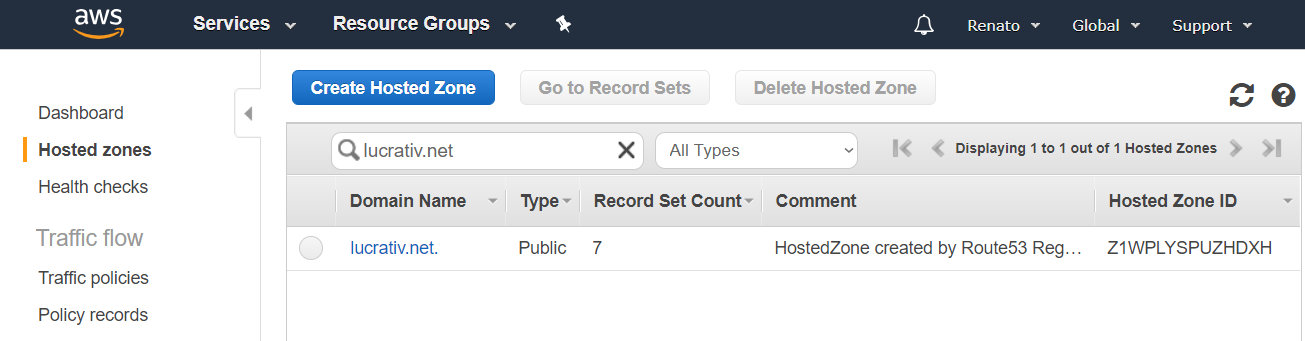
Once purchased, domain registration can take up to an hour. When your domain is ready, it will appear under Hosted Zones. In AWS, a hosted zone allows you to access and modify DNS records for your domain.
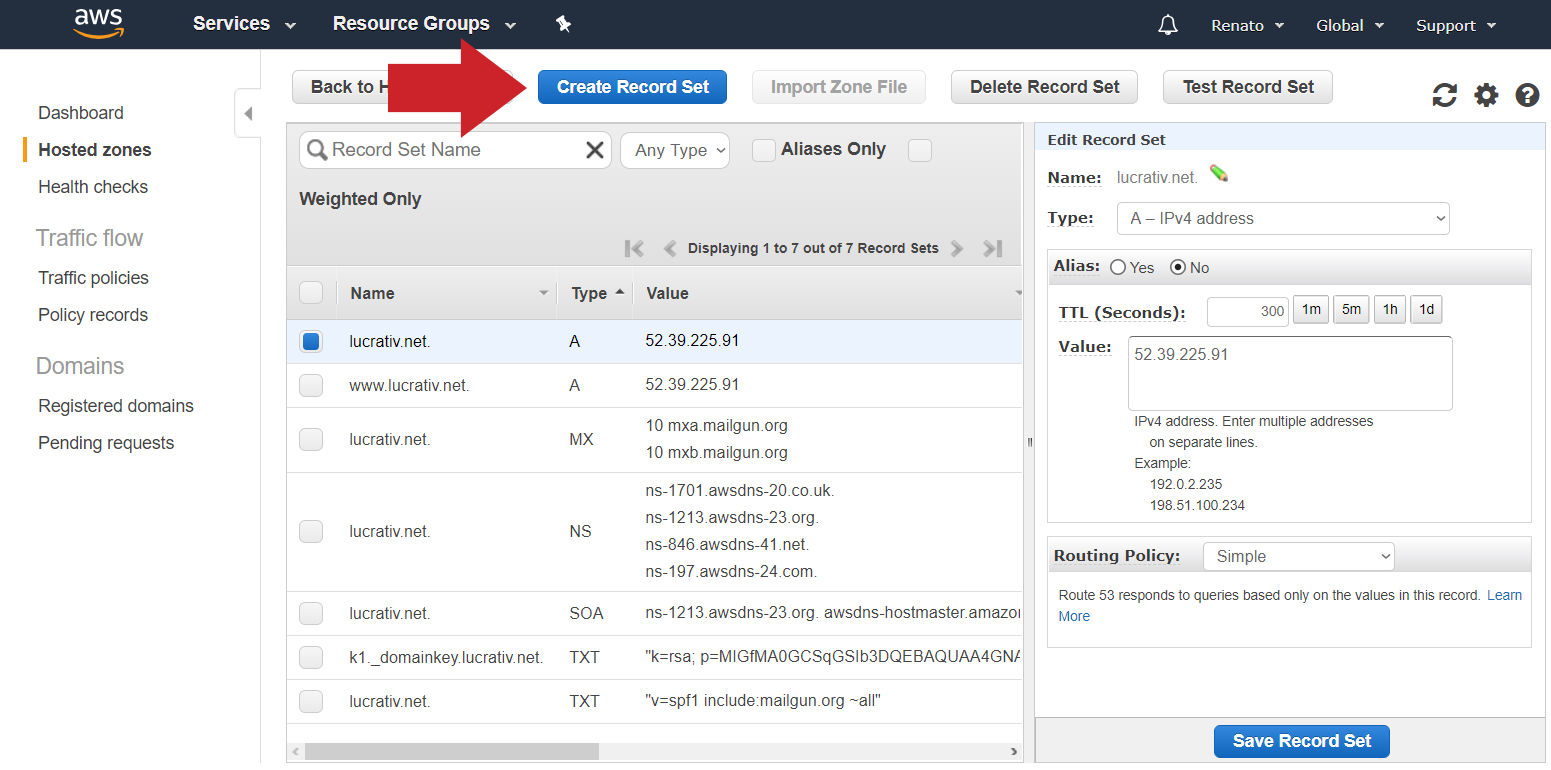
2.2 Creating a record set
Click on Create Record Set. We will direct requests for cratemail.org to our .NET Core server instance.
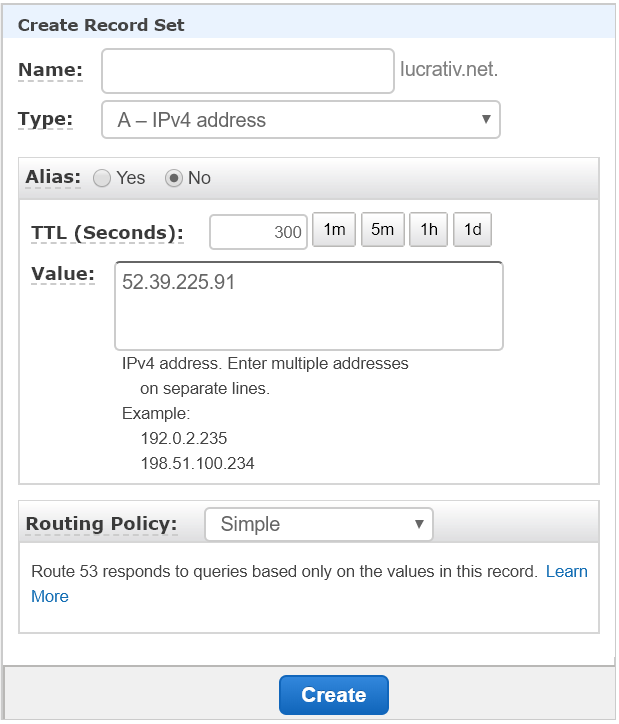
On the right-hand panel, select A - IPv4 address for the type. For the value, add your instance's IPv4 address. Click on Create at the bottom to finish connecting your domain.
3. Mailgun Configuration
Create a Mailgun account if you don't have one, then log in to your Mailgun dashboard. Go to Domains, then click on Add New Domain, and type in your domain name at the prompt. Mailgun will give you 3 DNS record sets that you will have to add in your domain's hosted zone in order to connect your domain.
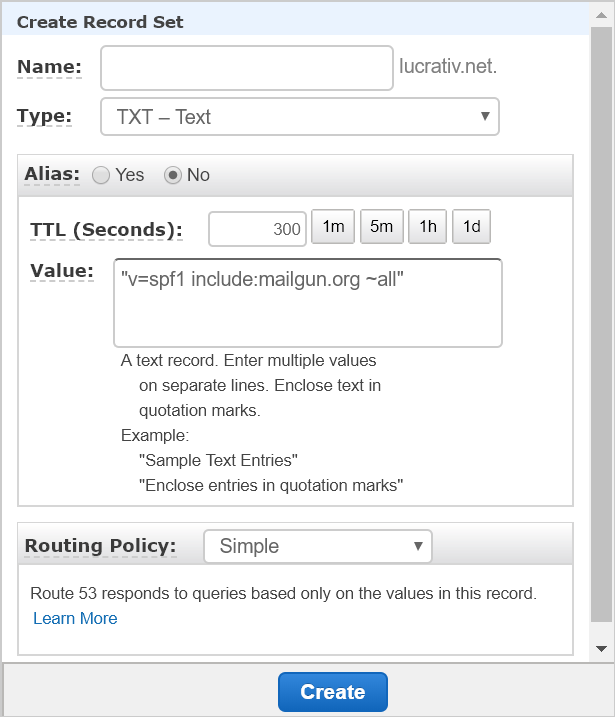
3.1 SPF
The first record is a SPF record. Go back to the AWS console, then enter your domain's hosted zone, and create a record set like previously demonstrated, but this time, select TXT - Text for the type, and copy and paste the value given from Mailgun's generated SPF record into the value box. In most cases, it's:
v=spf1 include:mailgun.org ~all.
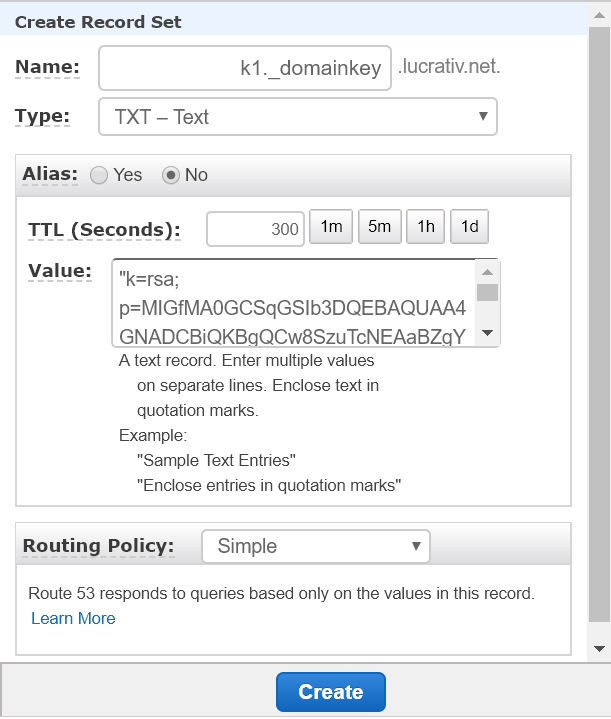
3.2 DKIM
Similarly, create another record set for the DKIM record, with TXT - Text for the type. Copy and paste the unique key given from Mailgun's generated DKIM record into the value box. Be sure to type in the given subdomain into the name field as well.
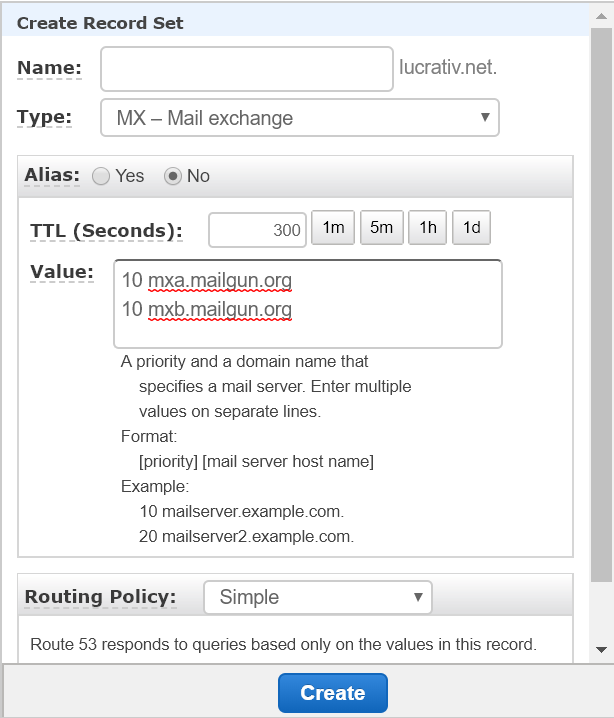
3.3 MX
Finally, create one more record set for the MX record, with MX - Mail exchange for the type. Copy and paste the mailgun server URL(s) and the corresponding priority indexes given from Mailgun's MX records into the value box. This one is usually:
10 mxa.mailgun.org
10 mxb.mailgun.org
Going back to Mailgun, return to the domain configuration page where you left off, and click on Check DNS Records Now. If the record sets were configured properly, your domain will go into Active state, meaning that Mailgun will be able to send and receive emails with your domain name.

3.4 Routing
Before we continue, let's go ahead and declare our API endpoint in advance. The API endpoint is where Mailgun will send incoming email messages as HTTP POST requests. Click on the Receiving tab, then click on Create Route, and create a route with the following settings:
- Expression Type: Catch All
- Under Actions, check "Store and notify". Add https://cratemail.org/api/Mail to the field, replacing cratemail.org with your domain name
4. Server setup
4.1 Connect to the server
To operate our newly created server instance, we'll need an SSH client like PuTTY to connect to our instance. Download and install PuTTY in your computer if you haven't already, then launch a PuTTY session with the following configuration settings:
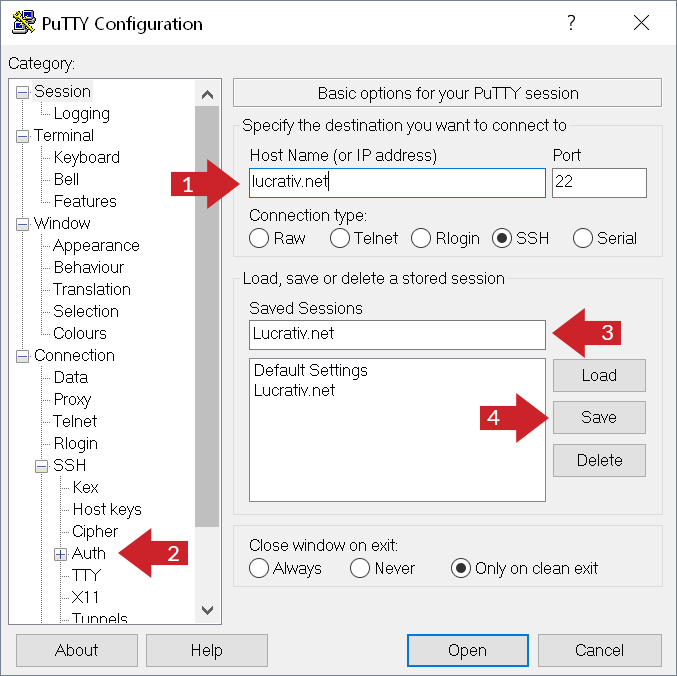
- 1: In the main session screen, for the Host Name (or IP address) field, type in your domain name.
- 2: Under Connection -> SSH -> Auth, the last field asks for a Private key file for authentication. Enter your keyfile location here.
You may also want to set the following configuration settings to speed up your connection workflow
- Under Connection -> Data, in the login details box, for the "auto-login username" field, type in ec2-user.
- 3,4: To save your configuration, type in a name of your choice in the field under Saved Sessions and click on Save.
With the configuration set in place, click on "Open" to remotely connect to your server instance. PuTTY will open up a shell terminal where you will be able to run commands for your server. We'll run a few commands to install the web server and database that we need for our email application.
4.2 Install Caddy
Caddy is a modern HTTP/2 web server with automatic HTTPS. We'll use it to create a secure environment for our email application. Run the following commands to set up Caddy:
sudo -ito get admin privileges.cd /home/ec2-userto go to your home directory.wget https://github.com/caddyserver/caddy/releases/download/v2.0.0-beta10/caddy2_beta10_linux_amd64to download Caddy.mv caddy2_beta10_linux_amd64 caddyto rename the Caddy executable as 'caddy'.nano Caddyfileto create a configuration file for Caddy. Type in the following text, replacing cratemail.org with your domain name:
cratemail.org {
     proxy / localhost:5000 {
          transparent
     }
}
Here, we are instructing Caddy to redirect HTTP requests to Kestrel, the integrated web server used in .NET Core applications. Press Ctrl + O, then enter, to save the configuration. Now run the following command to launch Caddy:
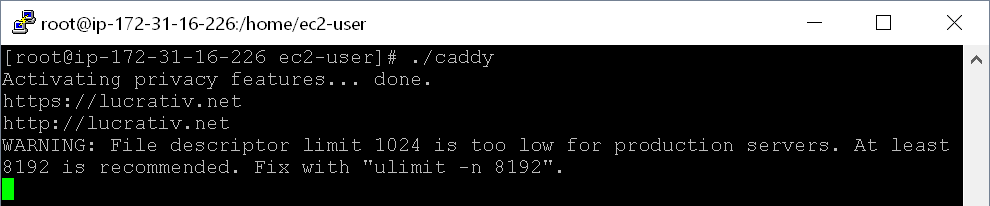
-
./caddy
Caddy will emit a few information messages, then it will silently run in the foreground. Once the web server is running, you may close the shell terminal. We'll need a new shell connection to install our database. Open another PuTTY window and connect to your server instance once again.
4.3 Install MariaDB
MariaDB is a modern port of MySQL, a free and open-source relational database. We'll use it to store our email application data. Run the following commands to set up MariaDB:
sudo -ito get admin privileges.yum install -y mariadb-serverto install MariaDB from Amazon's repository.systemctl start mariadbto launch MariaDB.mysql_secure_installationyou will be prompted with a set of questions. Remember your SQL password, we will use this later.nano /etc/my.cnfto modify MariaDB's configuration file.- Type in a hashtag before
bind-address = <some ip-address>to comment this line out. Skip this step if you don't find the line, otherwise, comment and press Ctrl + O, then enter, to save the MariaDB configuration file. mysql -pto run SQL commands.GRANT ALL PRIVILEGES ON *.* TO 'root'@'localhost' IDENTIFIED BY 'mypass' WITH GRANT OPTION;, replace 'mypass' with your SQL password.GRANT ALL PRIVILEGES ON *.* TO 'root'@'1.2.3.4' IDENTIFIED BY 'mypass' WITH GRANT OPTION;, replace '1.2.3.4' with your IP address, and 'mypass' with your SQL password.CREATE DATABASE cratemailto create a database for our email app.systemctl restart mariadbto restart MariaDB with our recent changes.
With the web server and database ready, we can now start working on the codebase portion of our email application.
5. ASP.NET Core Web Application setup

We'll use Visual Studio to build all the components needed for our email application. Download and install the latest version of Visual Studio. It should come with the latest version of .NET Core.
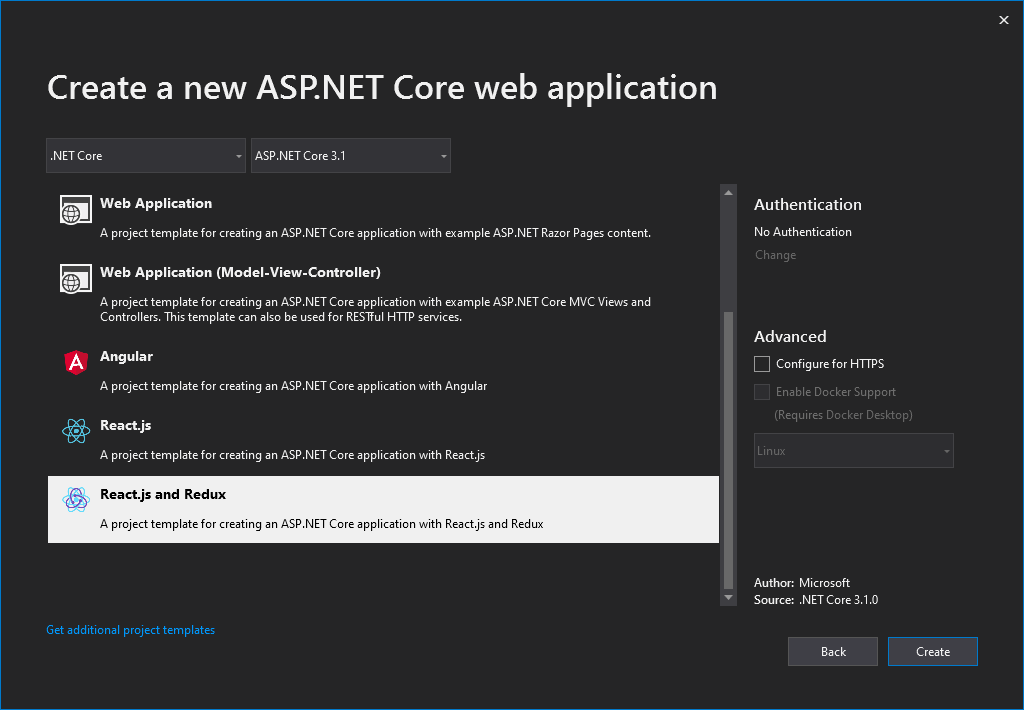
Open Visual Studio and create an ASP.NET Core Web Application project. For the framework version, be sure to select a version of .NET Core that matches the version running on your server. Select React.js and Redux from the project templates, and uncheck Configure for HTTPS. We will let Caddy act as our HTTPS server instead. Click OK to create the project.
In this project, we will create the API endpoint we declared earlier in our Mailgun route. Before we begin coding, let's set up a few libraries and resources to speed up our development workflow.

5.1 Project libraries
Our project codebase will rely on three library dependencies. In Visual Studio, dependencies are installed by using the NuGet Package Manager. Let's go ahead and install them. From the top menu, go to Tools -> NuGet Package Manager -> Manage NuGet Packages for Solution. Click on the Browse tab to search for packages.
The first package is Entity Framework Core. This component will allow us to scaffold and modify our database from Visual Studio as needed. Search for Microsoft.EntityFrameworkCore, select it from the list, then select your project on the right hand panel, and click Install.
The second package is an Entity Framework Core driver for MySQL. It's compatible with MariaDB, so we'll use it to connect to our database. Search for Pomelo.EntityFrameworkCore.MySql, select it from the list, and install this package into your project as well.
The third package is RestSharp, a HTTP client library for C#. Search for RestSharp, select it from the list, and install it into your project.
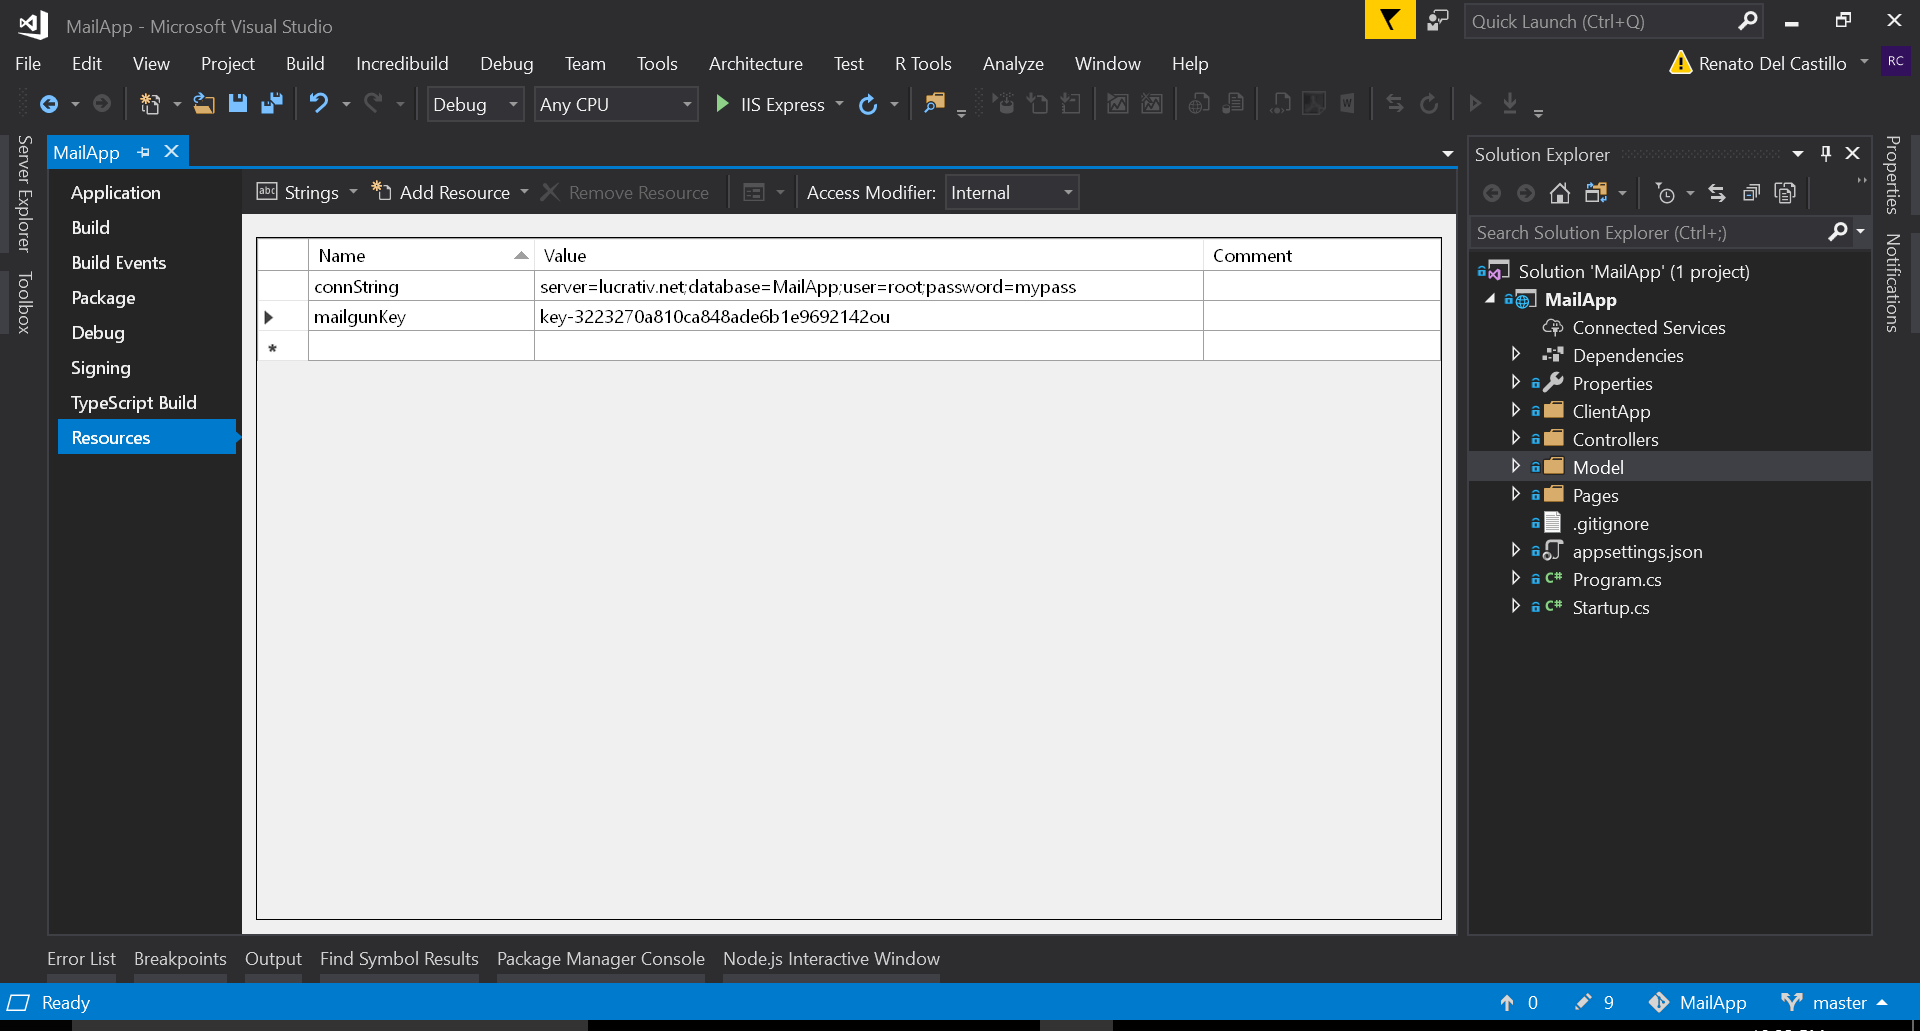
5.2 Project resources
Let's store our database connection string and Mailgun API key as text resources in our project. In the Solution Explorer window, right-click on your project and choose Properties. Under Resources, click on the link to generate a resource file.
Add a string resource named connString. The value should be your MariaDB connection string using the following format:
server=cratemail.org;database=cratemail;user=root;password=mypass
Add a string resource named mailgunKey. The value should be your Mailgun API key, which you can retrieve from the domain details page in your Mailgun dashboard.
5.3 Database setup
With our project setup ready, we can go ahead and start coding. Let's build the database foundation for our project. In Solution Explorer, right-click on your project, and add a new folder called Model. In this folder, we will store a set of class-based entities that will later be translated to database tables using Entity Framework Core. Right-click on the Model folder, go to Add -> and select Class... from the bottom of the list. For the class name, type in Mail.cs and add the following content:
namespace MailgunCore.Model{public class Mail{public int ID { get; set; }public string Sender { get; set; }public string Recipient { get; set; }public string MailSubject { get; set; }public string BodyHtml { get; set; }public string BodyPlain { get; set; }public string MailDate { get; set; }}}
The class in this file is a representation of an email message in our application. For each message, we will store a message ID along with the sender, recipient, and subject of the message. We'll store two versions of the actual message content, an HTML version and a text-only version. Lastly, we'll keep track of the date and time when each message was sent.
Next, create another class under the Model folder, and call it Context.cs, with the following content:
using Microsoft.EntityFrameworkCore;using MailgunCore.Properties;namespace MailgunCore.Model{public class Context : DbContext{public DbSet<Mail> Mail { get; set; }protected override void OnConfiguring(DbContextOptionsBuilder optionsBuilder){optionsBuilder.UseMySql(Resources.connString);}}}
Unlike the previous class, this class is not an entity. Rather, it is a special class that serves as a configuration layer between your database and Entity Framework Core. Each DbSet property corresponds to a database table, and the OnConfiguring method resolves how Entity Framework Core will connect to your database to make changes. In this case, we are using our project's MySQL driver dependency along with the database connection string we stored earlier to establish a connection to our MariaDB database.
Let's go ahead and update our actual database by running a few Entity Framework Core commands. Go to the Package Manager Console by clicking on View -> Other Windows -> Package Manager Console.
At the PM> prompt, type in Add-Migration InitialDB and press enter to generate a migration file. In Entity Framework Core, migration files convert entity changes made in your project into database instructions. Since it's the first time we are creating a migration, Entity Framework Core will generate instructions to create tables out of the DbSet properties declared in our context class.
Back at the prompt, type in Update-Database and press enter to execute the database instructions from your migration files into the actual database.
5.4 Database verification

HeidiSQL is a graphical client for relational databases. We'll use it to access our MariaDB database and verify that the Mail table we created with Entity Framework Core actually exists. Download and launch HeidiSQL, then create a session with the following configuration:
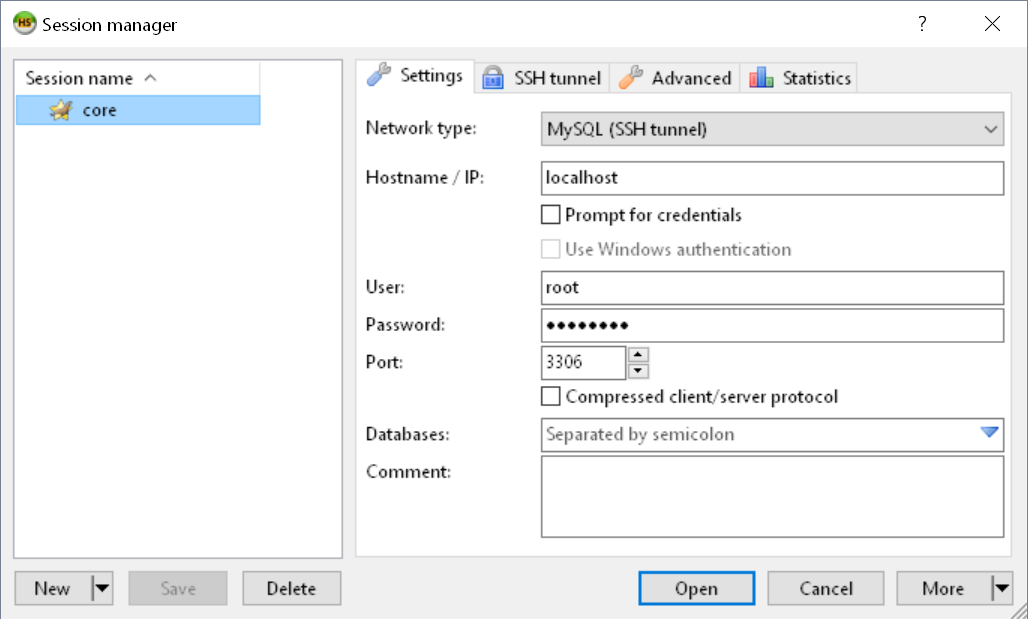
Under "Settings" tab:
- For network type, select MySQL (SSH tunnel).
- For Hostname/IP, type in localhost.
- For User, type in root.
- For Password, type in your MariaDB password.
Under "SSH tunnel" tab:
- For plink.exe location, download plink and type in the location of the plink.exe file in your filesystem.
- For SSH host + port, type in your domain name for the host portion, and 22 for the port portion.
- For Username, type in ec2-user.
- For Private key file, enter the location of the keyfile used to connect to your instance.

Save your session, then click Open to connect to your database. On the left panel, double-click on the cratemail database to view its tables. You should be able to see a Mail table. Double-click on the Mail table to verify that the properties in our Mail.cs entity class propagated into table columns.
6. Building an API
Now that you have a database table to store messages, we'll want to store incoming emails from Mailgun to this table. To do that, we'll build an API in the location we declared earlier in our Mailgun route configuration. This API will receive emails as HTTP POST requests, with message data passed as request parameters. You can view the entire list of parameters in Mailgun's API documentation. For our email application, we'll only use a few of these parameters.
6.1 Parameter class
Let's create a class to encapsulate the parameters we want to use. Right-click on the Model folder, and add a class called Mailgun.cs with the following content:
using Microsoft.AspNetCore.Mvc;namespace MailgunCore.Model{public class Mailgun{public string Recipient { get; set; }public string Sender { get; set; }public string From { get; set; }public string Subject { get; set; }[BindProperty(Name = "body-plain")]public string BodyPlain { get; set; }[BindProperty(Name = "body-html")]public string BodyHtml { get; set; }}}
To include additional parameters, you just have to add them as properties of the Mailgun.cs class. In most cases, each class property will directly map itself to a parameter of the same name. However, C# does not permit dash characters in property names, so for parameters named with dashes, you will want to append the BindProperty attribute, as shown for body-plain and body-html parameters.
6.2 API controller
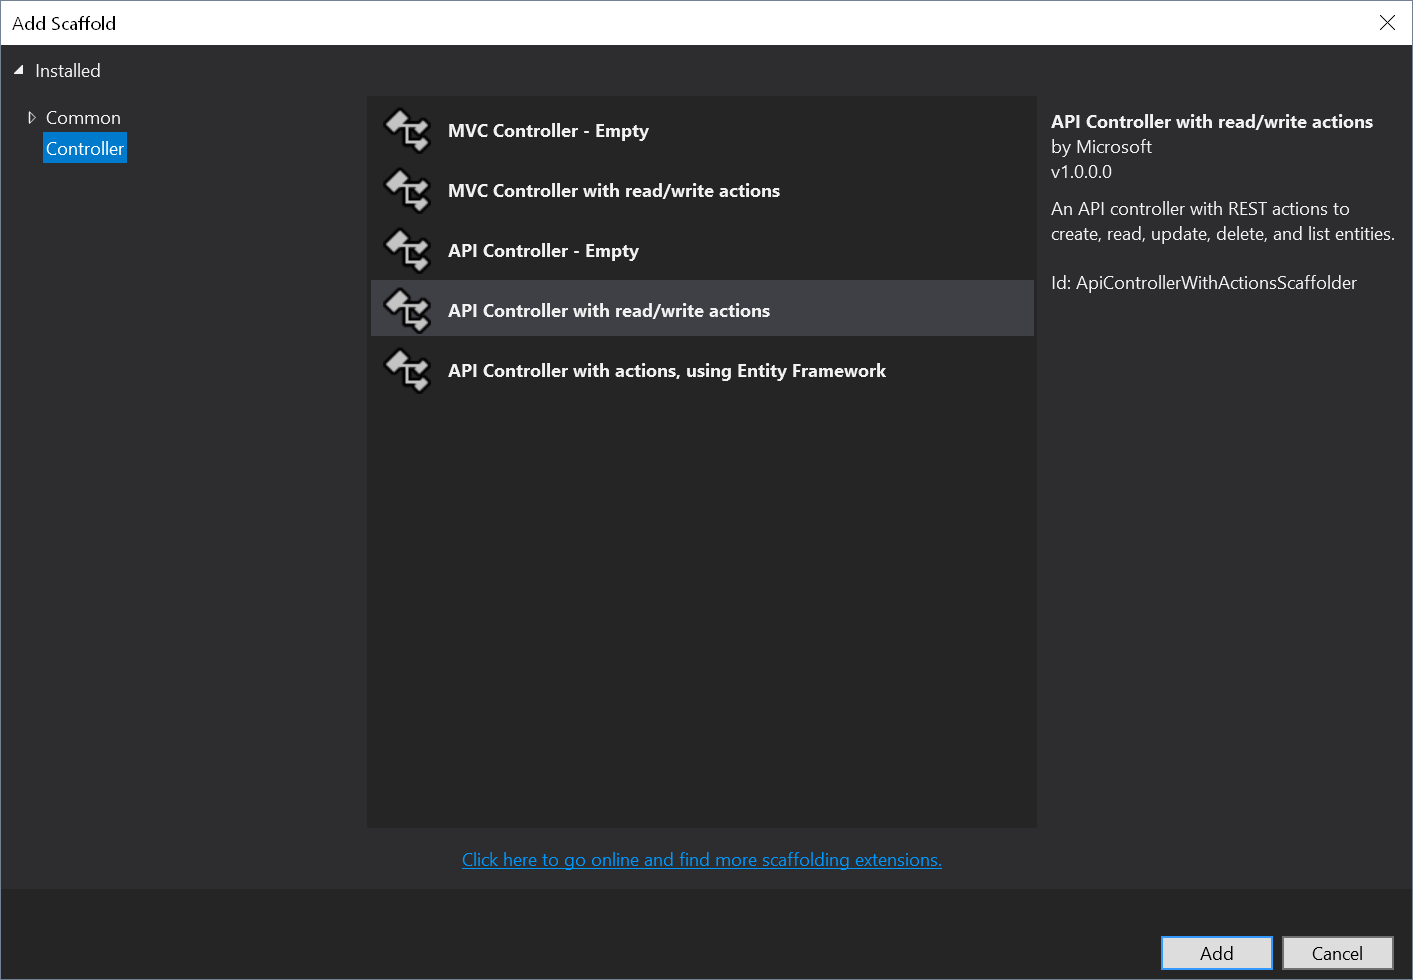
With the parameter class ready, let's go ahead and build the API. On the Solution Explorer, right-click on the Controllers folder, go to Add -> and select Controller.... Then choose API Controller with read/write actions, and click Add. At the prompt, name your controller MailController.cs, and click Add to create an API controller class.
To store incoming messages to your database, add the following content to the controller:
using System;using Microsoft.AspNetCore.Mvc;using MySql.Data.MySqlClient;using MailgunCore.Model;using MailgunCore.Properties;namespace MailgunCore.Controllers{[ApiController][Produces("application/json")][Route("api/Mail")]public class MailController : ControllerBase{[HttpPost]public IActionResult Post([FromForm]Mailgun msg){string insertSql = "INSERT INTO Mail(Sender, Recipient, MailSubject, BodyHtml, BodyPlain, MailDate) VALUES (@Sender,@Recipient,@MailSubject,@BodyHtml,@BodyPlain,'{0:g}')";DateTime timestamp = TimeZoneInfo.ConvertTimeBySystemTimeZoneId(DateTime.Now, "US/Pacific");string insertQuery = String.Format(insertSql, timestamp);MySqlConnection sqlConnection = new MySqlConnection(Resources.connString);sqlConnection.Open();MySqlCommand sqlCommand = new MySqlCommand(insertQuery, sqlConnection);sqlCommand.Parameters.AddWithValue("@Sender", msg.Sender);sqlCommand.Parameters.AddWithValue("@Recipient", msg.Recipient);sqlCommand.Parameters.AddWithValue("@MailSubject", msg.Subject);sqlCommand.Parameters.AddWithValue("@BodyHtml", msg.BodyHtml);sqlCommand.Parameters.AddWithValue("@BodyPlain", msg.BodyPlain);sqlCommand.ExecuteNonQuery();sqlConnection.Close();return CreatedAtAction(nameof(Post), msg);}}}
In this API, we are accepting POST requests, parsing message parameters into an instance of our Mailgun parameter class. We then store these parameters into our database as a Mail table entry using the INSERT INTO SQL command.
At this point, we are ready to implement our Mailgun server. Press Ctrl + Shift + B to build your project in Visual Studio. We will deploy the project solution to the server and test it to make sure it works.
7. Deployment and testing
7.1 Project deployment

To deploy our project, we will need a SFTP client to transfer files to the server. For this tutorial, we'll use WinSCP. Download and install WinSCP, then launch it with the following configuration:
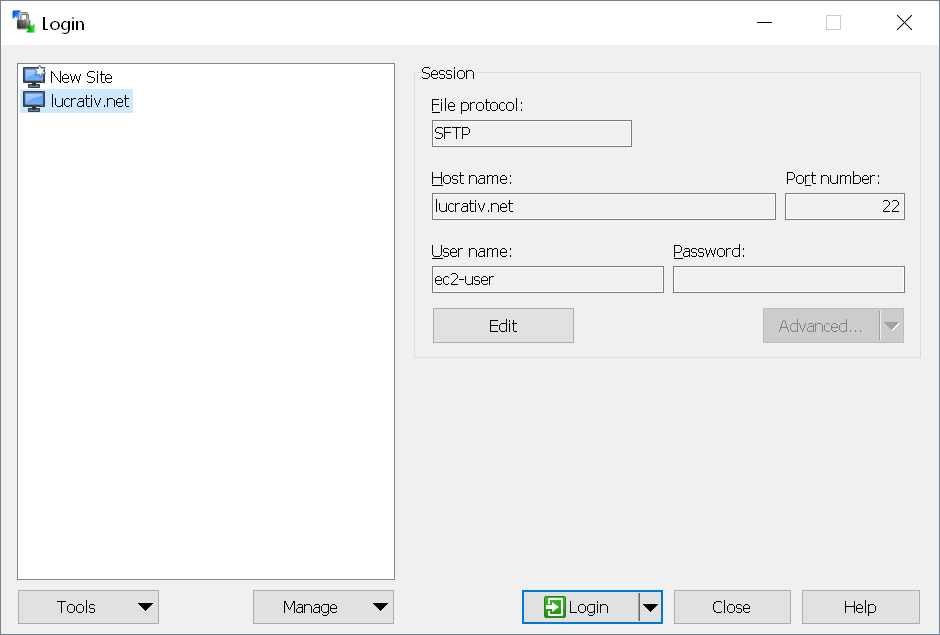
- For File protocol, choose SFTP.
- For Host name, type in your domain name.
- For port number, type in 22.
- For User name, type in ec2-user.
- Click on Advanced. Under SSH -> Authentication, go to the Authentication parameters box, and under Private key file, enter the location of the keyfile used to connect to your instance.
Click on Login to connect to your server via SFTP. On the left panel is your computer filesystem. In this panel, browse to the location of your ASP.NET Web Core Application and locate your project folder.
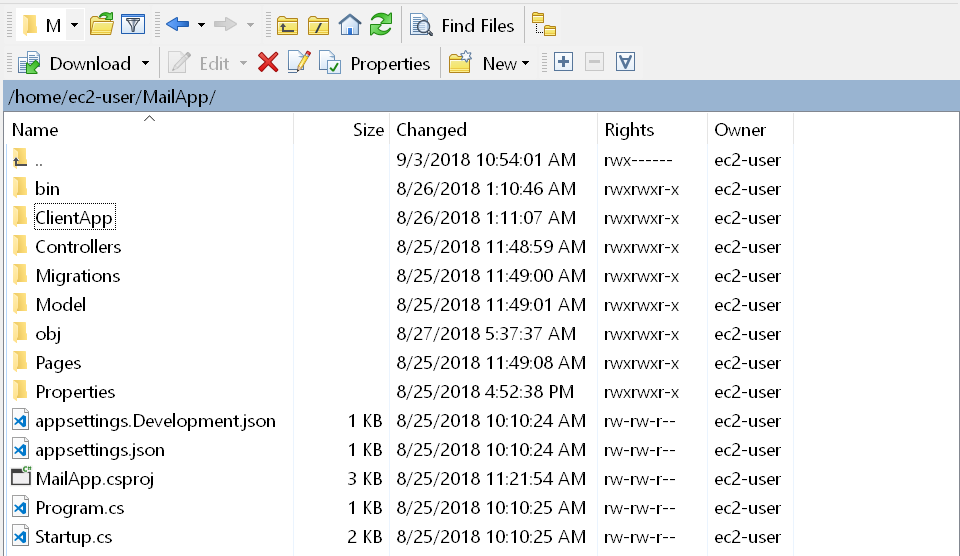
On the right panel is your server filesystem. In this panel, browse to /home/ec2-user/. We'll use that location to deploy your project solution. Drag your project folder from the left panel into the right panel, and wait until WinSCP is done transferring all your project files.
When the transfer is finished, open PuTTY and connect to your instance, then run the following commands to launch your project:
sudo -ito get admin privileges.cd /home/ec2-user/to go into your home directory.wget https://nodejs.org/dist/v8.11.4/node-v8.11.4-linux-x64.tar.xzto download NodeJS.tar -xf node-v8.11.4-linux-x64.tar.xzto unpack the NodeJS distribution.mv node-v8.11.4-linux-x64 nodejsto rename the NodeJS distribution.export PATH=$PATH:/home/ec2-user/nodejs/binto add NodeJS to your environment path.cd /home/ec2-user/Cratemail/ClientAppto navigate to the frontend portion of your project directory.npm installto install frontend dependencies in the server.cd /home/ec2-user/Cratemail/to go back into your project directory.dotnet restoreto prepare your project for launch.dotnet runto launch your project.

If everything went well, you should see the following message on your shell:
7.2 Testing
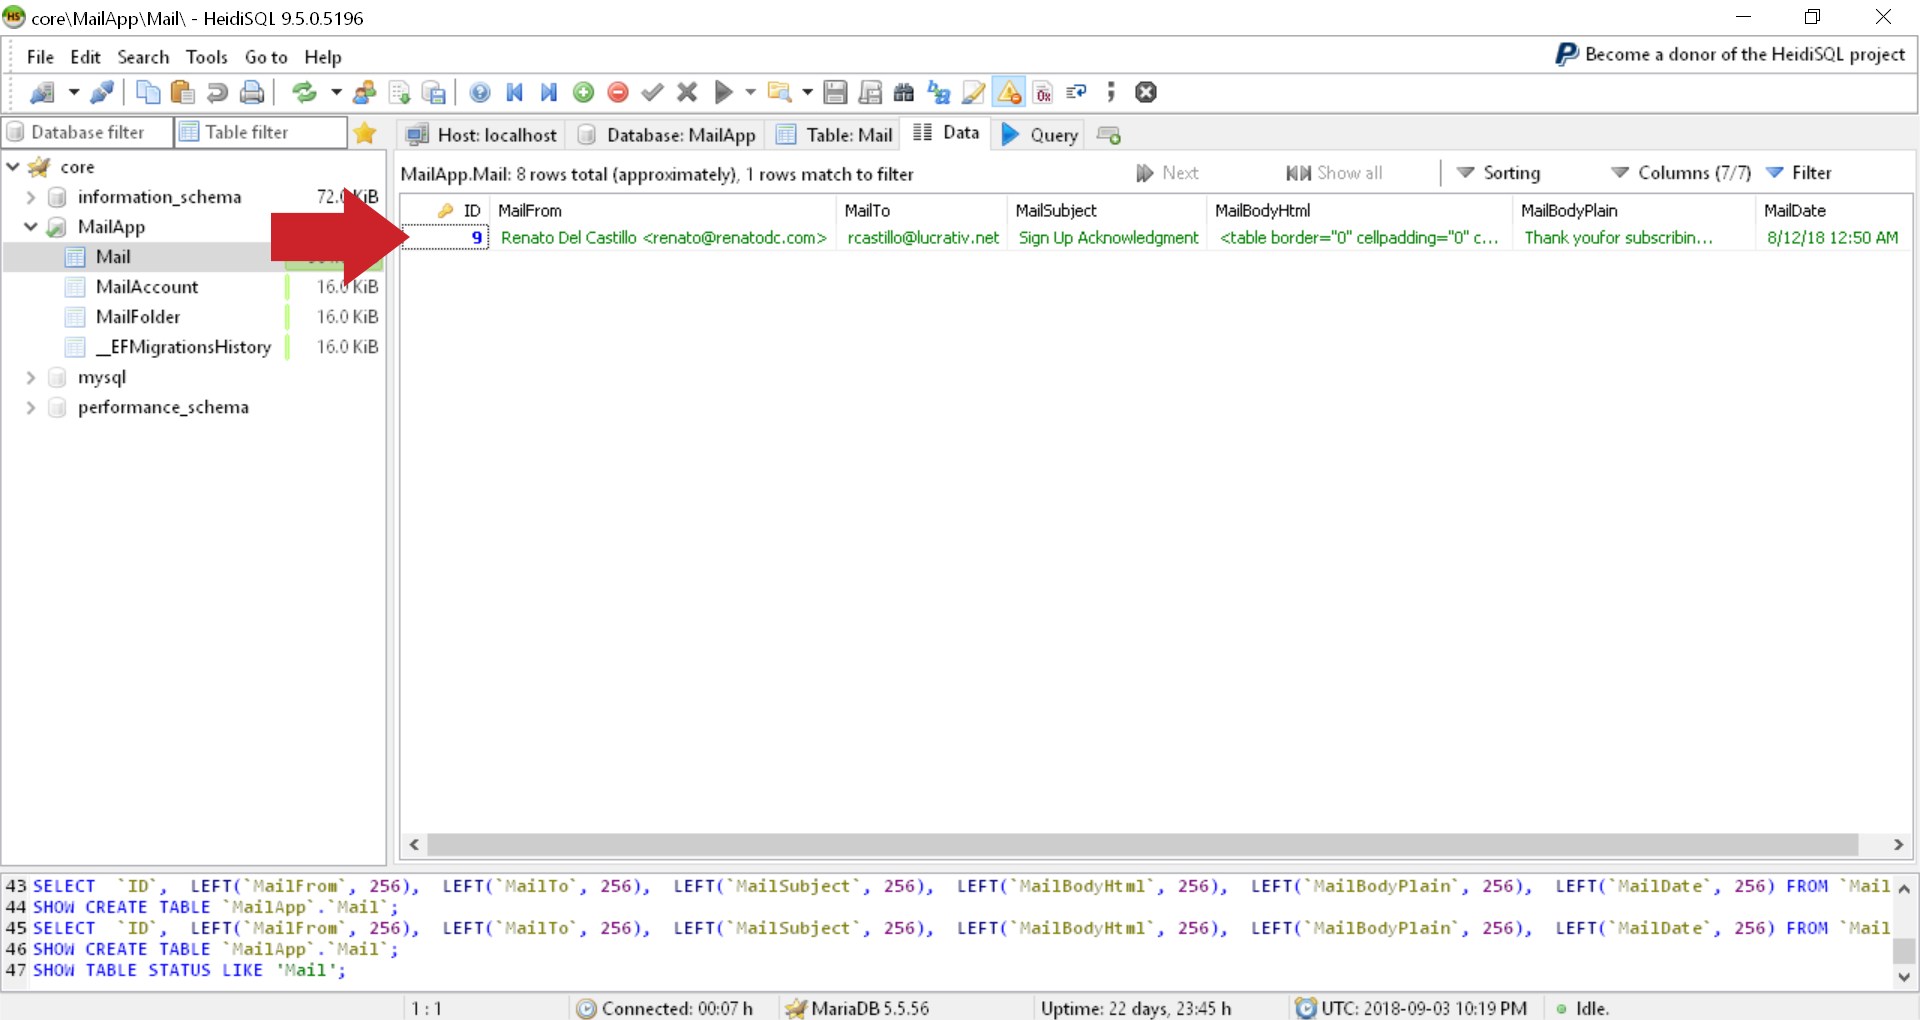
Let's test our Mailgun server implementation by sending an email from your personal email account to any recipient in your domain, for example, me@cratemail.org. After sending the email, open HeidiSQL, go to the Mail table, and click on the Data tab. You should see a new row with the contents of your test email.
With the mail server in place, we can now focus on building a beautiful mail client. In the next part of this tutorial, I'll show you how to build a webmail client using React and Redux in Visual Studio.